
I recreated the IF by IFTTT user onboarding in eight different high-fidelity prototyping tools to get an idea of the differences between them: Proto.io, Pixate, Framer, Facebook’s Origami, RelativeWave’s Form, Principle, Flinto for Mac and Tumult Hype 3.
See how these recreations behave compared to the real thing:
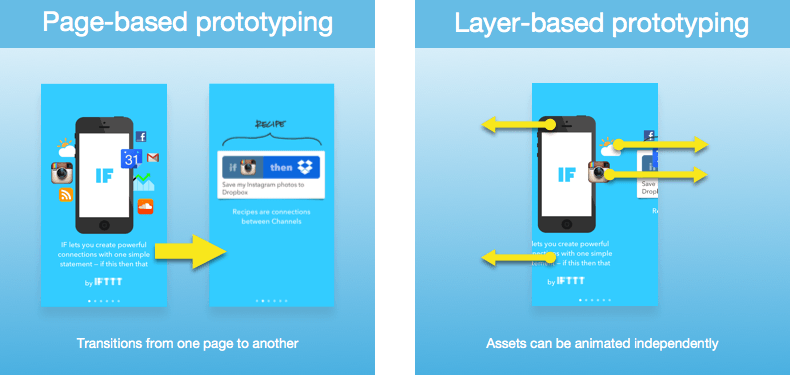
Pages versus Layers
Why did I select these eight? I discovered that recreating something that is this animation-heavy (icons moving around in different directions and at different speeds) is not even possible in most prototyping packages. The majority of tools only let you connect static pages, while only the more complex ones let you animate different objects or layers within a given page.
I’ll explain it a bit more.
Page-based tools
In a page-based tool, you lay out different screens, and then you make hotspots or buttons to connect them together. You tap a button somewhere on one screen to go to another screen. Page-based tools generally also have a choice of different transitions between screens, like fade in, slide in from the right, slide up from below, etc. It’s a bit clunky, but it’s a good way to make quick mockups when you’re still figuring out the flow of an app (which and how many screens are needed, how they would appear, where buttons should go, etc.).
Examples of page-based tools are: Briefs, InVision, Notism, Flinto, Fluid, Mockup.io, Prott, POP, Marvel, Balsamiq, Red Pen and Keynotopia. Granted, in some of these tools you can have animations or scrollable areas within a page, but you cannot use them to emulate every interaction possible in real native apps.
Layer-based tools
Every asset, interface element, or in other words, layer can be made tappable, swipe-able, draggable… but also animated. Prototyping a complete app in a tool like this would be crazy, though; it would be too much work (you might as well build the real app). But they’re great for trying out new interactions, or for tweaking the timing of an animation.
Proto.io, Pixate, Framer, Facebook’s Origami, RelativeWave’s Form, Principle, Flinto for Mac and Tumult Hype 3 are the tools I tried.
So, onwards with the chosen ones.
1. Proto.io
Web-based, with players for iOS and Android.
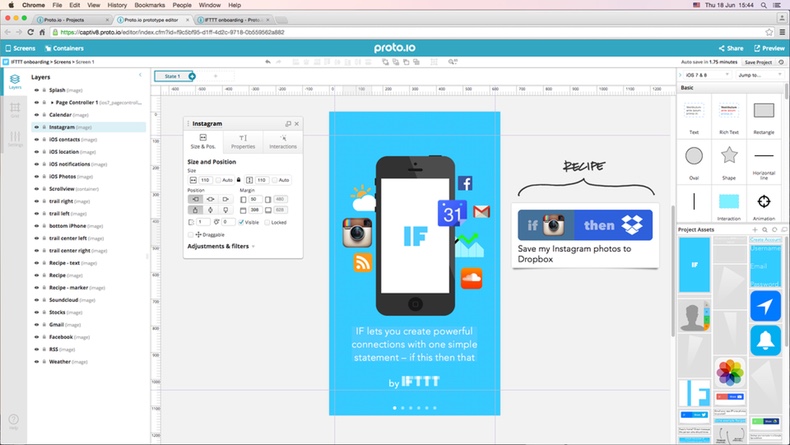
Proto.io is a surprisingly powerful web app; it has many, many functions. But because everything works by drag-and-drop, clicking buttons and selecting values from lists, it can be a bit overwhelming sometimes to find the setting you need.
Because of the nature of the IF prototype – different objects moving at different speeds – I had to add several custom JavaScript calculations. The provided single-line text field was too small for the lengthy calculations so to have an overview I kept them in a text file on my computer. Important to note is that these JavaScript expressions can fail without warning. Be sure to check the console of your web browser when something doesn’t work. (I had an error caused by a variable containing a negative value.)
Previewing while creating the prototype
This is rather annoying: you have to click [Save Project] and then [Preview] every time you want see the result of the changes you made.
Sending a prototype to a client
- On the web: Easy – you can generate a public link, like this one. (These links can also be opened in a mobile browser, and added to the iOS home screen as an ‘app’.) You can also present your work to the general public in Proto.io Spaces.
- On a device: You can make (free) Reviewer accounts for clients and give them access to a project. They can run the prototypes in the iOS or Android app.
Differences between this prototype and the app
Not many. The animations are less fluid, though, because I had to attach many interactions containing custom JavaScript calculations to the scrollview. It’s not too bad on the web, but it’s way too slow on a device. Playback speed seems to be more normal for simpler prototypes.
Pros
- Easy to make a quick mock-up because of the extensive library of standard UI elements, many of them customizable.
- Proto.io is also page-based: you can have multiple screens within a single project and create transitions between screens.
- Dropbox syncing for assets.
Cons
- No live preview.
- Animations can become slow when you add many interactions, like in this example.
- All your prototypes are saved on their web platform, which means that you can’t even run them when you would cancel your account. (There is the possibility to park your account: your projects will still be there when you reactivate your account. Parked accounts are $5 / month.)
- No 3D animation possible.
The prototype
view on Proto.io Spaces (sign up to import it to your account)
iOS app:
Proto.io
Android app:
Proto.io Player
Price:
$29/month or $288/year for 5 active projects.
There are also plans for 10, 15 or 30 active projects, and a free 15-day trial.
2. Pixate
Desktop application for OS X and Windows. Players for iOS and Android.
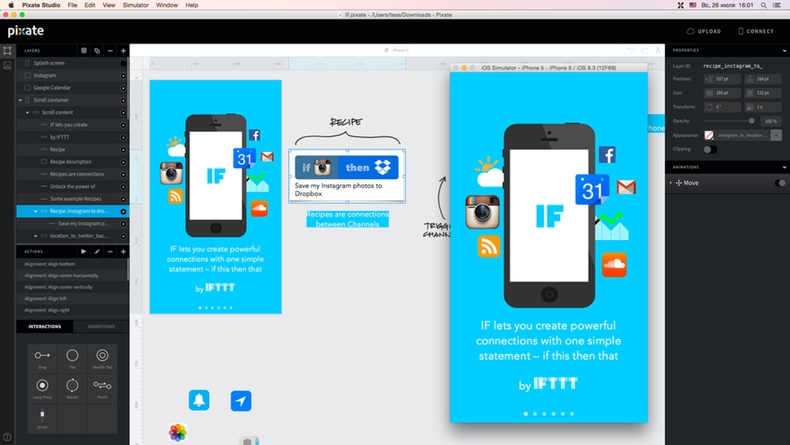
Pixate seems to strike the right balance between ease of use and functionality: it can do a lot more than the simpler page-based tools, but the learning curve is not too steep: after going through the User Guide and video tutorials you will be on your way. There are also several demos that you can deconstruct to see how they’re made.
Previewing
Pixate Studio can use Xcode’s iOS Simulator (on Mac) to run the prototype. You can also connect with the iOS or Android app over local WiFi. This works great, especially because both (Simulator + app) update instantly.
Sending to a client
- When you have a Cloud plan ($5/month) you can publish a project. People can then scan the QR code on the page with the iOS or Android player to run the prototype.
- You can also add unlimited collaborators to your Cloud account and give them access to prototypes. They’ll have to log in to their account in the app.
- Or you can simply mail somebody the .pixate file. They can then open and run it in Pixate Studio (but also see how it’s made and change it).
Differences with the app
- The sixth page is missing, because the canvas in Pixate is only so wide.
Pros
- It’s easy to learn how to use it.
Cons
- Still a bit buggy; sometimes you might need to work around a bug.
The prototype
view in app | download .pixate file
Mac or PC application:
Pixate Studio
Price:
Pixate Studio
Free! (It used to be $149, until Google bought Pixate in July 2015.)
Pixate Cloud
$5/user/month or $50/user/year. (There is a free 30-day trial.)
3. Facebook Origami
Runs in Apple’s Quartz Composer for Mac. There’s a viewer for testing on iPhone or iPad.
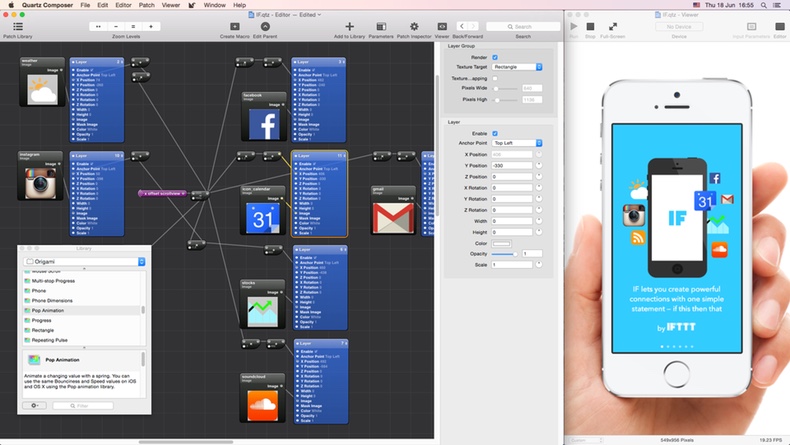
As you probably know, Origami is built by the design team at Facebook working on Paper. Origami is not a standalone program, it’s kind of a plug-in for Quartz Composer, a visual programming environment that is part of Apple’s developer tools.
You program in Quartz Composer by connecting patches to each other. Different patches have different functions, and Origami is mainly a set of extra patches made for app UI design. Many people (not me, though) will prefer this to having to write code, but when you have to describe something like “if this, then do that, with the value from this calculation, but if not…” you’ll still have to program, but by connecting several patches instead of writing lines of code.
On a side note: IDEO also created a prototyping framework based on Quartz Composer, called Avocado. It has a few functions that might be handy for some projects: Bluetooth integration, an iOS interactive keyboard, a dial patch for scroll wheel-like interactions and a flippable card patch. Layers can also be made draggable.
Previewing
- On the desktop: Quartz Composer has a viewer, and any change you make in the editor will instantly be reflected in the viewer.
- On a device: With the Origami Live app you can test on an iOS device plugged into your Mac. The app reacts to all gestures (taps, swipes, etc.) but is a actually just a viewport to what’s running in Quartz Composer. So if your Mac has difficulty running the prototype at 60fps, it will not run any faster in Origami Live.
Sending to a client
This is going to be difficult. You can of course make a screen-recording of your prototype, but this defeats the purpose of making an interactive prototype; you might as well make something in After Effects. The only real way to try a prototype on another machine is to have the same setup. So if your client uses a Mac, they can install Quartz Composer + Origami to run your prototypes – after registering as an Apple Developer, of course.
Differences with the app
It might run a bit slower than the real thing, depending on your computer. Quartz Composer is quite a power hog, and might have your computer’s fan spinning, especially when your Mac doesn’t have a powerful graphics card (like my Mac mini) or have a few monitors connected (guilty). I get maximum 20 fps, even when using just one monitor.
Pros
- The documentation might be a bit lacking but there’s a very active user community. Plus you can find several videos, tutorials and blog posts.
Cons
- It can be hard to find out how to do things and which (of the many) patches to use.
- It’s unclear if Quartz Composer is still in active development. The last version is from November 2011. But at the same time, Apple would probably launch a replacement tool (for visual interaction design using Quartz) before mothballing this one.
The prototype
Mac application:
install instructions
iOS viewer:
Origami Live
Price:
Free! You do need an Apple Developer account, but that’s also free,
as in beer, or whatever Apple developers might drink.
4. Framer
Framer Studio is a prototyping application for Mac, but Framer.js only needs Safari or Chrome.
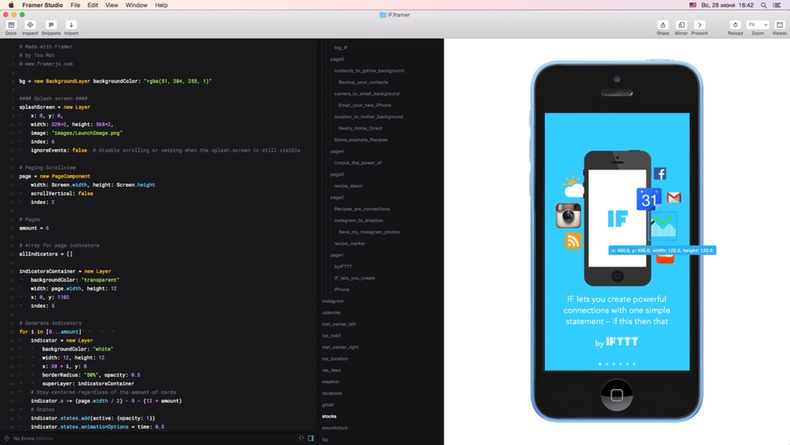
No dragging and dropping, pushing buttons, or connecting dots here – in Framer you will have to code. Programmers will feel at home, designers maybe less so. But it’s not too hard—Framer Studio uses a simplified version of JavaScript: CoffeeScript. But the fact that the actual engine (Framer.js) uses JavaScript makes for a lot of possibilities: you can do everything that’s possible in a web browser, so you can connect to servers to use live data, or create a Twitter client that shows real-time tweets.
Previewing
- On the desktop: Framer Studio has a live interactive preview on the right; it updates instantly when you change something.
- On a device: There are apps for Android and iOS. They all connect to Framer Studio when on the same WiFi network, and automatically refresh the prototype every time you save in Framer Studio.
Sending to a client
With one click you can generate a public page (like this one), which can be viewed in Chrome or Safari, or in a mobile browser. (The link can be added to the iOS home screen as an ‘app’.) The same link can also be opened in the viewers (actually just chromeless browsers) for iOS and Android. A big prototype like this one might take several seconds to load in the viewer, but then it animates smoothly.
Differences with the app
This prototype does a bit more than the other four: you can switch between the Sign in, Sign up and Reset Password modes on the last page. (You cannot actually log in or sign up, but even that would have been possible to recreate in Framer.)
Pros
- Integration with Sketch or Photoshop is as good as it gets: you can refer to layers or objects by the names you gave them while designing. (Framer.js has a Framer Generator Mac application included that does the same trick.)
- Anything that is possible with JavaScript—like using live data from web services, or using the accelerometer—is also possible in Framer.
Cons
- You’ll have to write code for everything, for every animation or interaction. You’ll need to be or get acquainted with CoffeeScript, maybe also JavaScript.
The prototype
view online | download .framer project
Mac application:
Framer Studio
Android app:
Framer
Price:
Framer.js, the JavaScript framework, is open-source and free.
Framer Studio is $99. (There is a free 14-day trial)
5. Form by RelativeWave
Mac application with a viewer for iPhone or iPad.
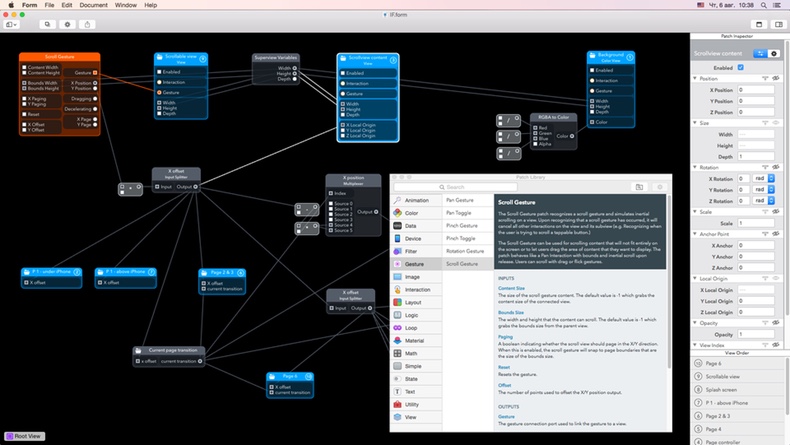
Form is clearly inspired by what Facebook and IDEO are creating on top of Quartz Composer. The folks at RelativeWave probably thought, “How would Origami look without the Quartz Composer baggage?” Origami users will feel right at home; many patches are the same and Form contains only the patches you need.
Previewing
The prototype actually runs in the (WiFi or USB) connected iOS app. You’ll notice that there is no readout of the values when double-clicking a connection between two patches if no device is connected. A viewer in the Mac application, like in Quartz Composer, would definitely be handy, and seems to be planned.
Sending to a client
The (free) iOS viewer can open .form files, so you can just email the file to the client for them to run on their iOS device.
Differences with the app
Not many, I think. Let me know if you find any.
Pros
- Compared to Origami: the prototype runs natively on the device, so it’s a lot more responsive compared to Origami Live.
- You can use your device’s camera and location. (Origami can use your Mac’s webcam.)
Cons
- Same as in Origami when you have a complicated prototype: the resulting noodle soup. Grouping patches helps to keep an overview.
The prototype
Mac application:
Form
iOS app:
Form Viewer
Price:
Free! The Mac application used to be $79.99, but when Google bought
RelativeWave in November 2014 (only months after launch) they made it free.
6. Principle
Mac application with a player for iOS.
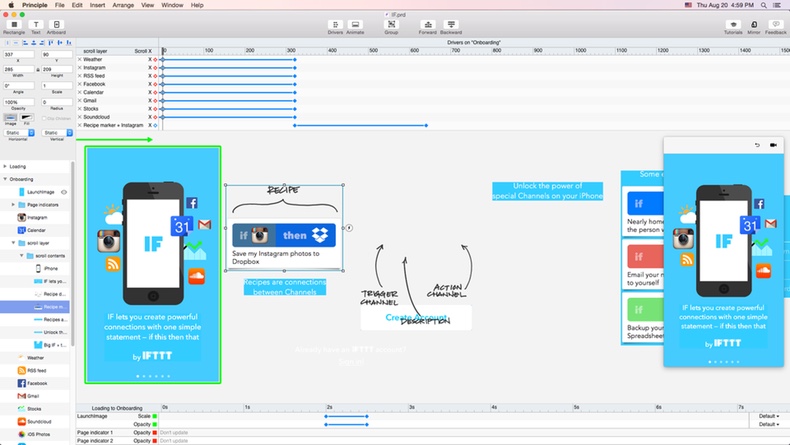
Ah! The thing that was missing in the tools described above: timeline animation. Animating with a timeline will be familiar if you used Adobe After Effects or — remember those days? — Adobe Flash. (I have to mention, Proto.io also uses a timeline for animating between states in a page.) Principle uses a timeline on the bottom of the screen for animating objects between pages.
And there’s a second timeline: With the Drivers timeline (actually a valueline, top of the screen) you can use the continuously changing position of a draggable or scrollable layer to animate other objects in the same page. Scrolling left or right in this IF prototype drives the positioning of almost all objects.
 Since in this prototype the paged scrollview (a.k.a. carousel) drives so many other objects, I had to plan well and carefully place my keypoints on the timeline. I even had to place my screen in look-at-me-I’m-a-programmer portrait mode. (Not needed anymore: I was using the first version of Principle in which you couldn’t yet scroll the list.)
But then again, the average project will not contain this many moving parts all connected to one scrolling gesture.
Previewing
Principle has a built-in preview window, which also lets you record a video or animated gif of a prototype. It works great.
Previewing on a device is also how it should be: connect your iOS device via USB and open Principle Mirror; it will be recognized automatically. Any changes you make are updated instantly, without even needing to save. The prototype will also continue to run after disconnecting from USB.
Sending to a client
The Principle Mirror iOS app can open and play Principle files. (Pro tip: A triple-tap will restart the prototype.) Note that the files are not saved in the app, so it’s best to keep the .prd file in Mail app or another place for reopening in Principle Mirror.
Differences with the app
None, except that the white button on page 6 is not tappable. I tried to add a touch down state to this button, but every interaction that is not triggered by a scroll or drag gesture needs a new page. It’s easy to duplicate an existing page and make some changes, but in this case it’s a big page, and any changes to the drivers in the original page made objects fly around unpredictably when I released the button.
Pros
- Timelines! A nice visual overview of every property that is animated.
- Quick and easy video and animated gif creation.
Cons
- No 3D.
- Animations always happen between pages (called artboards in Principle) representing different states, so you’ll have to create many. (Except animations driven by a scroll or drag gesture, like in this prototype.)
The prototype
Mac application:
Download free trial
iOS app:
Principle Mirror
Price:
Principle is $99.
There is a 14-day trial, and only the days that you actually use it are counted.
7. Flinto for Mac
Mac application with a player for iOS.

At first I thought, “This is like the existing page-based Flinto (the web app) with the difference that you can tweak the transitions between pages a bit. Big deal.”
But the transitions have direct feedback: when you use a swipe gesture to go to the next page, you can control the speed of the transition with your finger and go back and forth (like you often can in native iOS apps). Plus, the fact that objects on a page can also be animated during a transition meant I could make the prototype, if I broke it up into seven pages, each with transitions between them.
But that does not imply that it took more work to finish the prototype. The Transition Designer (a separate view from the canvas, in which you can quickly switch between start and end states of a transition) is a very quick way of tweaking a transition because of the direct visual feedback. I finished the IF prototype in Flinto faster than in any of the other tools I tried.
The transition-based approach does have drawbacks, though: If you want to animate different properties on the same object with a different timing (say opacity + position), then you’re out of luck. As an example: the beams behind the iOS icons on page 4 stay visible when swiping to the next page because I couldn’t give the opacity animation a shorter duration.
Previewing
There’s a viewer in the Mac application, and you can use the iOS app (over WiFi) for a live preview. Both work perfectly and update instantly, without even having to save to see the results of your change.
Sending to a client
The (free) iOS app can open .flinto files, so you can just email the file to the client for them to run on their iOS device.
Differences with the app
The Instagram and Google Calendar icons are in the back when swiping to page 2, because pages are on top of each other or behind each other. The four light beams behind the iOS icons appear too early and disappear too late, because a separate timing for the opacity animation wasn’t possible; same for the notifications icon. Swiping backwards will give some animation artifacts: reversed transitions don’t always seem to work perfectly.
Pros
- The Transition Designer, hands down the fastest way of tweaking a transition.
- Sketch import. (Only one time, though; no updating afterwards.)
Cons
- Limited to only transitions between pages (but a page can contain scrollable areas).
- Same as Principle: when a screen has different states, you’ll need to make different pages.
The prototype
Mac application:
Download free trial
Also on the Mac App Store
iOS app:
Flinto
Price:
Flinto for Mac is $99.
There is a free 14-day trial.
8. Tumult Hype
Mac application with a viewer for iOS.
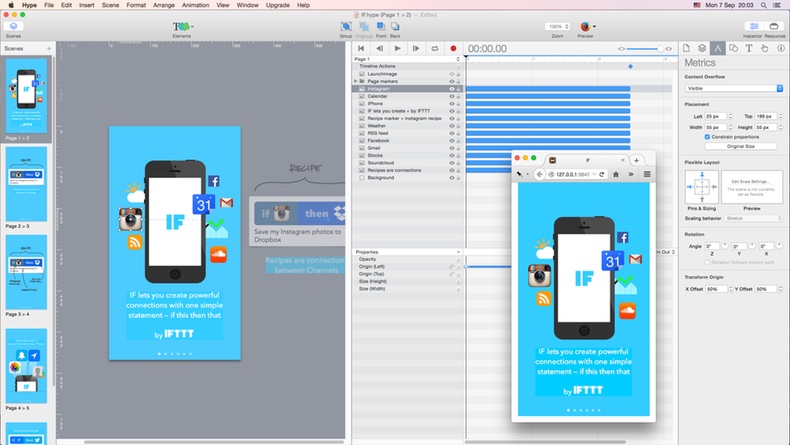
And another tool with timeline animation!
This prototype is actually kind of a hack: you’ll notice that the animation doesn’t follow your touch 100 percent. It’s an approximation. What’s actually happening is that a horizontal pan gesture will scroll though a paused timeline.
I think that I’m lucky this prototype was possible in Hype, because it probably cannot simulate all kinds of mobile interactions. But I always wanted to learn how to use Hype; it’s a great tool…for creating HTML5 animations.
Previewing
Hype’s preview function (⌘⏎) opens the project in your browser of preference, or in the Hype Reflect app running on the same WiFi network.
Sending to a client
A Hype project is just a webpage, so you can upload to a folder and mail your client a link, or — even easier — publish to Dropbox directly from within Hype.
Differences with the app
You can’t go back to a previous page because each page is another scene, with a trigger to load the next scene when you reach the end of the animation. There’s also no overshoot: you can’t scroll past the first or last page and see the animation continue.
Pros
- Hype can also be used for creating pretty nifty interactive websites. The Pro version ($49.99 upgrade) also does responsive layouts.
Cons
- Animations don’t look as smooth as in the other tools.
- Probably not usable for recreating every possible app interaction, because that’s not what it’s made for.
The prototype
Mac application:
Download free trial
Also on the Mac App Store
iOS viewer:
Hype Reflect
Price:
Tumult Hype 3 is $49.99.
There is a free 14-day trial.
What to use?
If you have not yet used any of these and want some quick prototyping done:
- Flinto for Mac
- or Principle
But if you’re ready to invest time into learning a powerful tool, or cannot get something done in Principle:
- Form, when you prefer visual programming
- Framer, if you would rather write code
If you’re on Windows: Pixate of Proto.io for quick prototyping and Framer.js (with CoffeeScript if you want) for the more advanced stuff.
In any case, it’s good to know different tools. Try a few to get a feeling of the differences and possibilities.
I’ve gotten acquainted with all of them, so I might use different tools for different situations:
- To make a tap-through prototype to figure out the flow of an app: Flinto for Mac. Any of the online page-based tools might do as well, but Flinto is pretty sweet, has the desktop advantage, and lets me work fast.
- When there are not yet any graphics, and a quick mock-up with standard UI elements is needed: Proto.io. It has a library with (configurable) interface elements for iOS, Android and Windows Phone.
- Form when the device’s sensors or camera need to be used in a prototype.
- For everything else: Principle when possible, Framer when needed.
A book coming up
 After trying these tools, I decided to write a book that teaches you how to use Framer. Surely it’s not the easiest tool to get started with for most designers (you’ll have to write code), but it’s powerful. Code is versatile, so there are not many limits to what you can create. Framer lets you use live data in your prototypes, integrates perfectly with Sketch and Photoshop, and is expandable (you can add modules created by other users).
Be sure to sign up on framerbook.com to know when the book is released and enjoy an early-bird discount.
You can find him on cptv8.com and medium.com/@cptv8, or on Twitter as @cptv8.